Published
- 4 min read
CNN Model With PyTorch For Image Classification

CNN
In this article, we will explore the process of constructing a straightforward Convolutional Neural Network (CNN) using PyTorch for the purpose of classifying images into distinct categories. This falls under the umbrella of classification, a subtype of supervised learning within the realm of machine learning. Supervised learning involves mapping inputs to corresponding outputs, and in the context of classification, the desired output is a specific class. This differs from regression tasks, where the model’s output is a real number.
Here is the basic outline of the steps that we are going to do:
- Set up
- Load the data
- Split the data
- Exploring Images
- Create a base model (general model for any classification)
- CNN model for classification (specific for the dataset)
- Hyperparameters tuning (Convolution, Padding, Stride, Pooling)
- Model training
- Evaluation
Set up
First we need PyTorch so lets install it: '''python pip install torch pip install torchvision '''
Now that we have PyTorch lets start the creating the model by importing it to the file: '''python import matplotlib.pyplot as plt import numpy as np import torch import torch.nn as nn import torch.nn.functional as F from torch.utils.data import TensorDataset, random_split from torch.utils.data.dataloader import DataLoader from torchvision import transforms '''
Its important to take note of the function The torchvision.transforms module provides various functionality to preprocess the images, here we will first use it to resize the image for (100*150) shape and then transforms them into tensors.
Load the data
Let’s first load the dataset which is given as two numpy files. First one called “features.npy” contains images flattened as a 2D array and the second one is called “classes.npy”.
       inputs = np.load("features.npy")
classes = np.load("classes.npy")
images = torch.tensor(inputs)
labels = torch.tensor(classes.copy())
dataset = TensorDataset(images, labels)
Split the data
Now that we have loaded the data, let’s think about how to split this data. Here I am going to use the 60-20-20 rule to split the dataset into training, test and validation set. Since our model cannot process the entire dataset at once due to fixed memory constraints, we opt for a systematic approach. By breaking the dataset into manageable batches, we overcome the limitations imposed by the memory capacity of the CPU or GPU. The choice of batch size is crucial, often taking the form of a power of 2, such as 16, 32, 64, 128, 256, etc. In this specific scenario, we’ve chosen a batch size of 128. Additionally, we’ve set aside 20% images for validation, leaving the remaining data for training purposes. To achieve a random split between training and testing datasets, PyTorch’s convenient random_split() function comes into play.
Exploring Images
Our dataset consists of images in form of Tensors, imshow() method of matplotlib python library can be used to visualize images. Also note that permute method reshapes the image from (3,150,150) to (150,150,3).
Load the data
Now we know what sort of data we are dealing with lets setup data loaders using PyTorch’s DataLoader class. Data loaders are used to efficiently load and iterate through batches of data during the training or validation phase of a machine learning model. By providing the training data and batch size as parameters to the DataLoader class, we instantiate two objects: train_dl for the training data and val_dl for the validation data. These data loaders are instrumental in managing the flow of data efficiently throughout the model training and validation processes.
Base model for image classification
Initially, we craft a foundational class that extends the capabilities of torch.nn.Module—a fundamental base class employed in crafting all neural networks. To this base class, we incorporate diverse functionalities catering to model training, validation, and result retrieval for each epoch. This augmentation serves as a reusable framework applicable to any image classification model, eliminating the necessity for redundant rewriting with each instantiation.
CNN model
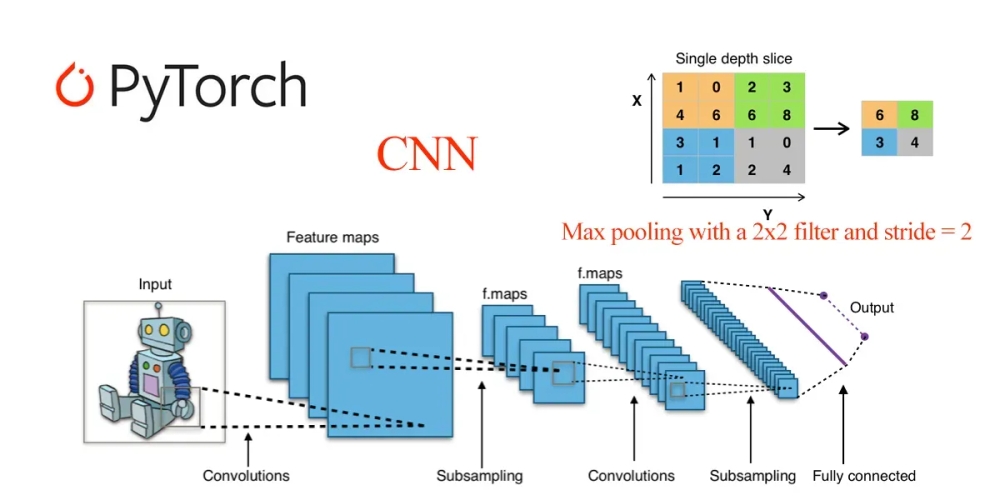
Now we can start to create our CNN model. In this model, there are 3 CNN blocks, and each block consists of 2 convolution layers and 1 max-pooling layer. Relu activation function is used to remove negative values from the feature map because there can not be negative values for any pixel value. Stride(1,1) used and padding is also 1. After applying convolution and extract features from the image, a flatten layer is used to flat the tensor which has 3 dimensions. The flatten layer converts the tensor to one-dimensional. Then 3 linear added to reduce the size of the tensor and learn the features.
Model Training
Now we have to train the weather classification model on the training dataset. So that first defines the fit, evaluation, and accuracy methods.
To train the model we can simply call the fit function like below:
Evaluation
We finally plot the graph for accuracies and losses to visualize how the model improves its accuracy after each epoch:
Finally, we can test the model using the test set we create at step 2.